Call us! (618) 395-3945

Tuesday, August 30, 2016

How to Build a DIY Tablet Stand

With all of the awesome advances in technology, most everyone has and uses a tablet (my kids do!)… They are handy for all sorts of things so wouldn’t it be nice to make a tablet stand to keep it upright and out of the way while you’re using it? (Hint- it helps with neck strain!) This stand is really easy to make and I’ve made two, customizing each of them in a different way!

DIY tablet stand


Supplies:

·         Scrap 1x12 board at 12”
·         Scrap 1x6 board at 6”
·         Scrap ¾” square dowel rod at 12”
·         2” brad nails
·         1-1/4” brad nails
·         Decorative ¾” trim or wood appliqués
·         Wood glue
·         Stain and sealer or primer and paint

Tools needed:

·         Jigsaw
·         Pneumatic brad nailer with compressor

Step One
Using the piece for the angled stand rest, draw a diagonal line across the board from corner to corner. Cut along this line with the jigsaw. Once the pieces were cut, I stained them prior to assembling the stand.

DIY tablet stand - D. Lawless

Step Two

Position the rest pieces on the back of the 1x12 base (the base leans on the angled portion of each piece), securing in place using glue and 2” brad nails through the front of the base into the rest pieces. (Use caution and keep fingers out of the way!)

DIY tablet stand - back side

Step Three

Secure the square dowel to the front of the stand base approximately 1” up from the bottom using glue and 1-1/4” brad nails.

Step Four

Secure the decorative trim to the front of the square dowel using glue. If using the decorative wood appliqués, they can be secured using glue at the top edge of the 1x12 base.

DIY tablet stand - appliques

Aren’t they great? This easy to make tablet stand can be customized in so many other ways – it can be decoupaged with photos, stenciled, painted or just left plain!

DIY tablet stand project

DIY tablet stand - finished

DIY tablet stand pin button
This is an easy project that would make a great gift, and several can be made over the course of a weekend! Until next time…

Thursday, August 25, 2016

How to Make a Clipboard Photo Hanger

make a decorative clipboard - pin

This clipboard photo or artwork hanger is really easy to make… It is the perfect piece to display a favorite quote, hang a scheduling calendar or just to display a little one’s latest masterpiece! The best part about it is that it can be customized to match the décor in the home, and several can be made in a day!

Supplies:

2" x 2" sheet of 1/2" plywood
Clipboard clip (found at any craft store) with two 1/2" screws
Wood adhesive

Tools Needed: 

Circular saw
Drill
Drill bit matching the diameter of the jewelry box pull

decorative clipboard - D. Lawless Hardware

Step One

Cut the piece of plywood to 12 ½” x 16 ½”. Most home improvement stores will do this for you. If you purchase a larger sheet of plywood, you can get more than one base for the clipboard hanger.

decorative clipboard - how to

Step Two

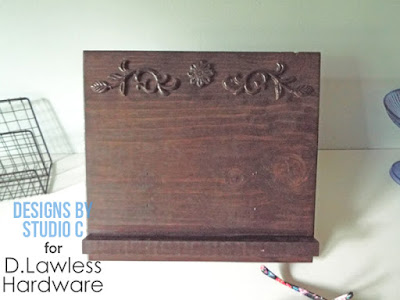
Secure the wood appliqués using the wood adhesive. I used a small flower medallion and a pair of swirls. You can use anything you’d like!

decorative clipboard - apply appliques

Step Three

Stain or paint the plywood piece. I used a one-step stain and sealer in a dark brown using three coats.

Step Four

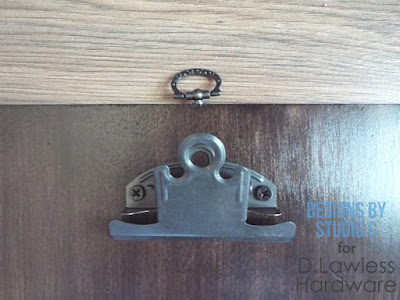
Spray paint the screw heads to match the clip, if necessary. Position the clip in the center of the top end of the plywood, then drive the screws in the holes to secure the clip in place.

Step Five

Mark the center of the very top edge of the plywood and drill a shallow pilot hole. Insert the screw portion of the jewelry box pull to hang the clipboard.

decorative clipboard - add the jewelry box pull

Add whatever you’d like to display to the clipboard photo or artwork hanger and enjoy!

Monday, August 22, 2016

New Product: Hera Cabinet Lighting

We currently have about twenty LED lighting systems from Hera on our site and we are continually adding more. We have all sorts of random stuff and lots of full sets. Our prices are less than half of anyone else carrying this stuff. Click here to see all our lighting options including the HERA.

This is HIGH DOLLAR stuff! We actually couldn't believe what people are paying for these LED lighting strips and are currently pricing them with our suppliers because it looks like Hera must be raking it in!

We work a lot of closeouts and these are a great deal, but don't expect our help with them, lol! If you know what you want then we are killing everyone on price, but we don't know much more about this product line than you do.

Friday, August 19, 2016

Free Hardware Friday #31 - First Time Participants Only!

THIS PROMOTION HAS ENDED. PLEASE CHECK BACK NEXT WEEK!

Good morning!

Today I'm limiting the giveaway to first timers. I actually quite enjoy people participating multiple times as I get good pictures and that's what I'm after. However as time has gone on and Free Hardware Friday has gotten much more popular I think I will occasionally limit the giveaway to subsets of people. Just being honest, the returns to me diminish with each person that participates each week.

For the newcomers, this is totally legit! I'm on #31 and I've given away hundreds of orders of free hardware. Each week I pick a piece we have an overstock of and offer it to our customers in exchange for pictures of the hardware and project you used them on. I'm getting behind on keep them all together but here's proof of all the projects from weeks 1-3.

No catches! You can take your time, I long ago realized putting internet randoms on a timeline was futile, lol! I enjoy the photos trickling in as they come and they REALLY help sell the knobs or pulls once I've got additional images up on the product page. You get hardware, I get a better product page.

Today's hardware is this satin nickel knob from Liberty Hardware and the full instructions on how to participate are below!


The rules are the same as every week....

1. E-mail me at the address on the bottom of the post with your name, address, the product number, and how many you need.

2. Please put in writing what you plan to use the knobs for and also give me permission to use your photos to market the knobs. I might put your pictures up on our HomeTalk account, Facebook, or website. If you click our HomeTalk link above you can see a lot of the projects completed by Free Hardware Friday participants since we started back in November.

I'm looking forward to lots of participants heading into our hiatus! Please contact me at lawlesshardware (at) gmail (dot) com to participate!


Wednesday, August 17, 2016

11 DIY Home Ideas

Have a project you've been wanting to get started on? Or maybe you just need a few ideas. Today, we're going to go through some of the top DIY projects using our hardware. Maybe you'll find some inspiration along the way.

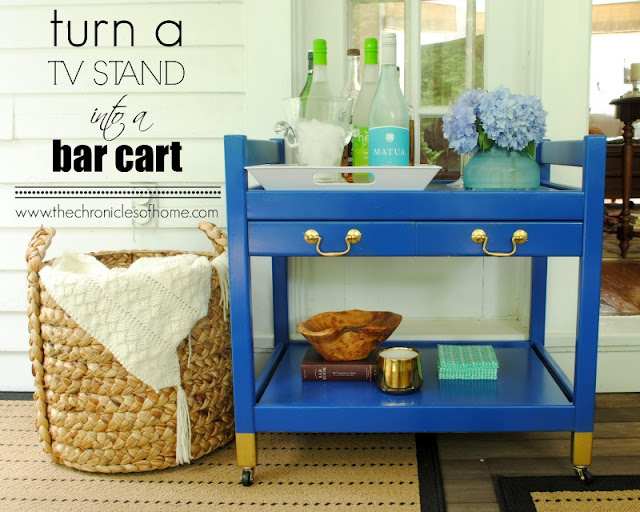
bar cart

The Chronicles of Home takes an old IKEA tv stand and turns it into a wonderful blue bar cart. The transformation from lackluster old TV stand to bar cart was actually really simple. Anyone can do it so check out the how to by clicking over.

clay knobs

These clay drawer label knobs can be made in six easy steps. The pictures are illustrative, but for a more in depth look check out Liz Marie's blog.

built in closet

This is a very comprehensive DIY from Remodelaholic. Cassity guides you step by step through the process of this built-in closet rebuild from upcycled furniture.

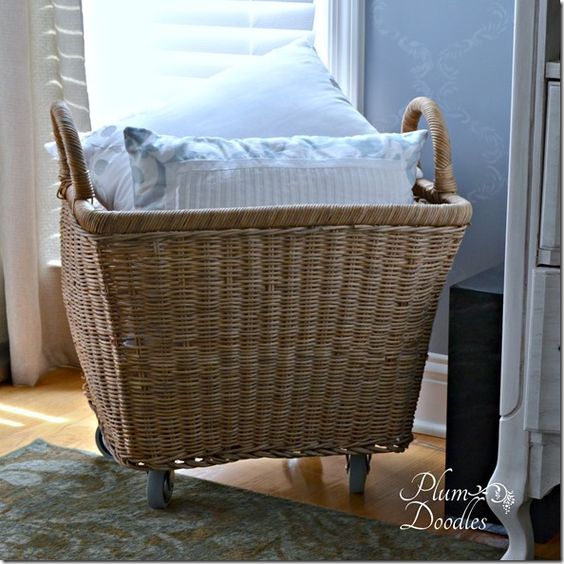
wicker basket

From Plum Doodles, this DIY wicker basket with wheels is an easy project to take on. See how she adds the casters to the wicker basket to make a great rolling storage space for your home.

rolling garden cart

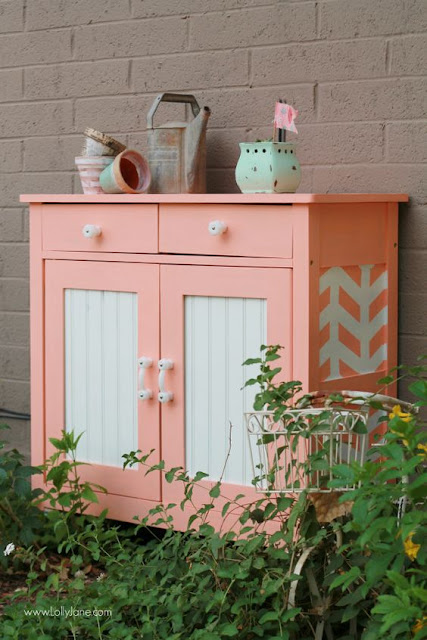
This project is great for storing all your goods inside and taking it with you around the yard. Lolly Jane walks you through the process of creating a DIY rolling garden cart.

serving tray

A quick and useful tutorial from Happy Hour Projects shows you how to turn a cutting board into a serving tray in 10 minutes or less! 

diy towel rack

Dwelling in Happiness had a boring build grade towel bar in her guest bathroom. The makeover made for a lot prettier place to hang the towels with this DIY towel rack and shelf.

jewelry organizer

Ever needed a place to put all your jewelry? Juju Sprinkles creates this sleek black jewelry organizer to help you out. Our dare I say cheap, but high quality, cup hooks make this DIY organizer nice and neat.

herringbone dresser

The before and after photos show what a tremendous job was done on this herringbone dresser DIY. Infarrantly Creative walks you through this incredible transformation.

laundry room

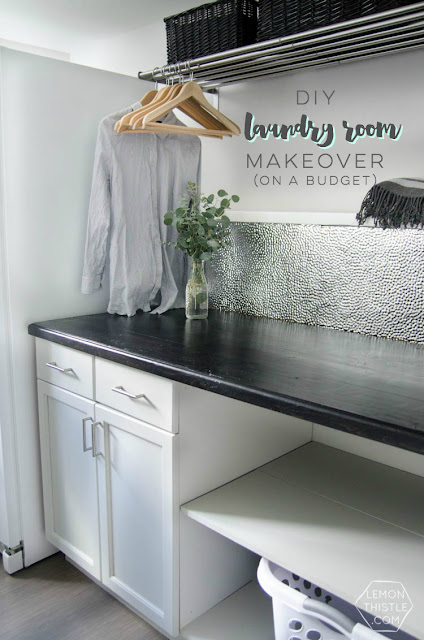
Lemon Thistle walks you through this DIY laundry room makeover from cabinets, to countertops, to details and decor.

kitchen island

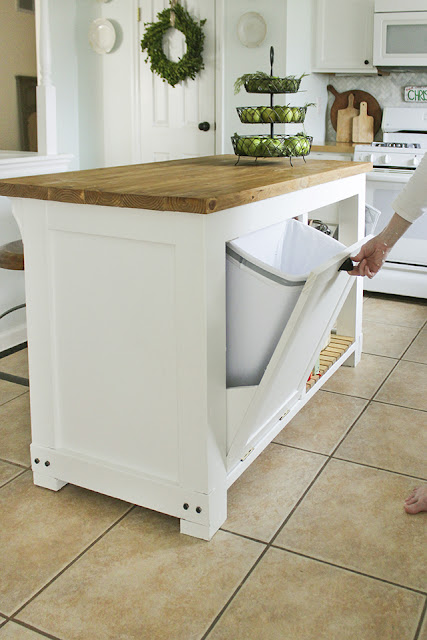
Shades of Blue Interiors shares with you the free build plans for this DIY kitchen island with trash storage. Both functionally and aesthetically pleasing you'll want to check this tutorial out.


Monday, August 15, 2016

Popular Products: Antique English Bail Pull

D. Lawless is known for high quality at a low price and today's popular product feature fits that bill exactly . Our D. Lawless brand simple antique english bail pull runs under $1 and has been featured all over the place on dresser and furniture makeovers! The product page has accumulated many photos of the product in use from our blog partners so I'd thought I'd show it off. You can click through to each full project by clicking the image!

Each project was great so I'll just post them up in the order we got the pictures. First up is this dresser from Saw Nail & Paint. I can probably credit these nice shots for so many other bloggers deciding to use this product on their makeovers.

Antique English Bail Pull - Saw Nail & Paint 2

Antique English Bail Pull - Saw Nail & Paint

The next post comes from In My Own Style and features this pull on another, brighter, blue furniture makeover. The pull looks beautiful against the bright blue background of this corner cabinet!

Antique English Bail Pull - In My Own Style

Showing off the versatility of the antique brass finish, Anna from Ask Anna used this pull on black built in cabinets.

Antique English Bail Pull - Ask Anna

This nice close up shot come from one of the blogs we work with often, Finding Silver Pennies. Again, you can see how great this finish looks against every color of paint. This time matching perfectly on a white grain sack dresser with blue stripes.

Antique English Bail Pull - Finding Silver Pennies

Another great post showing off this bail pull against another shade of blue comes from Inspired Restoration on this restored drop front desk!

Antique English Bail Pull - Inspired Restoration

This collage came to us from a customer that used them on a beautiful off white dresser makeover! Blog photos are great but I can't get enough photos from our customers! I'd like to eventually find a way to allow people to post their projects directly to our site...one day...

Antique English Bail Pull - Customer Project

And finally, a post that went up just today that got me realizing how popular this pull really was. These shots are from My Creative Days on an "easy" DIY nursery dresser.

Antique English Bail Pull - Dresser Makeover

Antique English Bail Pull - My Creative Days

Friday, August 12, 2016

Technical Difficulties Friday!

We've had one disaster after another this week with our order system and pretty much you name it. That didn't give me time to get a product ready and I don't have time today to deal with all the participants and blah blah blah...

So, here is a small giveaway for some gift cards that runs until the next Free Hardware Friday. Good luck all! a Rafflecopter giveaway

Tuesday, August 9, 2016

Three Ways to Hang Frames, Signs, or Mirrors

Everyone has artwork of some sort in the home and there are so many ways to hang it on the wall. There are all types of different fasteners, hangers and hardware, as well! Three of the easiest hangers to install are keyhole hangers, sawtooth hangers and (my favorite) soda can tabs with a washer and screw. Each of these hangers only take minutes to install and are super-strong to ensure that the artwork stays put!

1. Keyhole Hangers

Keyhole hangers are metal plates that screw onto the back of a frame or sign with a sort of oval shaped opening. The opening is larger on the bottom to fit over a screw head, then slides down so that the narrower portion of the oval rests behind the screw head that is mounted on the wall.

To install keyhole hangers, position the hanging plate on the back of the frame or sign and mark the position of the screw holes. Pre-drill the holes using a drill bit that is the same diameter or smaller than the screw being used to fasten the plate taking care not to go all the way through the art piece. Tighten the screws through the holes in the plate into the pre-drilled holes. 

How to Hang Mirrors

How to Hang Mirrors - D. Lawless Hardware

How to Hang Signs

2. Sawtooth Hangers

Sawtooth hangers are little metal strips with “teeth” on one end that sort of grip the nail or screw in the wall where the art piece will be hung. The sawtooth hanger is fastened to the frame or sign using tiny nails. Holding those little nails with one hand while trying to tap them into place with a hammer can be a tedious job! I like to use needle nose pliers to hold the nail while I tap the head with a hammer. Works like a charm!

How to Hang Mirrors - sawtooth

How to Hang Mirrors - sawtooth and brads

How to Hang Mirrors - sawtooth D. Lawless Hardware

3. Soda Can Tab with a Washer and Screw

This, by far, is the cheapest option for hanging artwork! Using a regular soda can tab, place a screw through a washer, then through the smaller hole in the soda can tab and drive the screw into the frame or sign. Use a standard screw driver to slightly bend the soda can tab to make it easier to hang on the nail or screw in the wall.

How to Hang Mirrors w/ a Soda Can Tab


Hang Mirrors with a soda can tab

That’s it – three easy ways to hang frames, signs or mirrors on the wall that are inexpensive and easy!

Thursday, August 4, 2016

Free Hardware Friday #30

THIS PROMOTION HAS ENDED

This week's knob is from Liberty Hardware. You can have as many of these brushed satin nickel knobs as you want to complete your project if you promise to send me pictures once you are done. That's it, no catches! Just follow the rules below the picture of the knob.

Free Hardware Friday #30 - silver knob

The rules are the same as every week....

1. E-mail me at the address on the bottom of the post with your name, address, the product number, and how many you need.

2. Please put in writing what you plan to use the knobs for and also give me permission to use your photos to market the knobs. I might put your pictures up on our HomeTalk account, Facebook, or website. If you click our HomeTalk link above you can see a lot of the projects completed by Free Hardware Friday participants since we started back in November.

I'm looking forward to lots of participants heading into our hiatus! Please contact me at lawlesshardware (at) gmail (dot) com to participate!

Wednesday, August 3, 2016

July D. Lawless Blog Features

Today I get to show off all the projects from all the blogs that used hardware from us over the last month. We got lucky and had several posts go up that weren't sponsored at all and those are ALWAYS welcome of course! This round up of articles each month has become our most popular blog series! If only because I get to tag 20 people at once, lol! But seriously, we get a ton of views on these articles and for good reason, the projects and photography are all wonderful.

Without further ado I'll start with a post from The Kim Six Fix where she used this beautiful set of matching satin nickel knobs and pulls on a dresser makeover. She only paid $9 for the dresser!

Simple nickel pulls for desk

Here we have a huge dresser totally made over by Kandice at Just the Woods. She painted the hardware to get exactly the finish she wanted and the results are awesome!

Barn Door Meets Metallic Bronze Drexel Dresser

Seems like we've got one from Number Fifty-Three every month and I'm so glad I can say that! This little cabinet makeover turns an old cabinet into the faux apothecary style with a beautiful paint job with General Finishes.

Apothecary project

Another of our monthlies comes to us in this lovely new kitchen from Evolution of Style. The old kitchen was blue and let's just say too much blue. But now it's a clean, bright white with satin nickel hardware!

DSC_0201

Next up is another white kitchen from Bless'er House, this time in the farmhouse style. I'm really partial to white kitchens that use dark hardware. The contrast is always eye catching to me. The shot below shows off the farmhouse style sink and the dark oil rubbed bronze hardware.

Modern Farmhouse Kitchen Makeover Reveal | blesserhouse.com - So many budget-friendly DIY projects packed into one kitchen!

The next post is one from June actually, but I missed it because I didn't provide the hardware for it and missed it in my web tools! From Delightfully Noted, this DIY antique wood filing cabinet features our little label holders! Jennifer was kind enough to link over to our site so we owe her one!

white antique cabinet with label holders

This two toned kitchen is from Domestic Imperfection and matches satin nickel cup pulls with cable style pulls that match the cables in her suspended shelves. Very unique and modern look!

budget blue and white farmhouse kitchen

Little touches can help make any projects just that much prettier! This is a perfect example from Her Tool Belt where Amy used a little glass knob from us in the middle of this mason jar centerpiece.

Cute planter boxes for a party, wedding or your kitchen table. Free plans to build a scallop mason jar centerpiece.

Cute planter boxes for a party, wedding or your kitchen table. Free plans to build a scallop mason jar centerpiece.

My Creative Days shows you how to take a yard sale find and turn into into rustic farmhouse decor! This chippy white dresser is topped off with flat black hardware from D. Lawless!

Shop Yard Sales For Farmhouse Decor On The Cheap

This stunner of a kitchen comes to us from The Turquoise Home! The article includes a nice tutorial with some simple tips on how to keep your hardware perfectly centered when installing.

Installing cabinet hardware can be intimidating! This simple trick makes installing new cabinets pulls so easy!

And last but of course not least is Stacy from Embracing Change with this coral painted dresser using hand painted ceramic knobs from us!


Til next month!!