Call us! (618) 395-3945
Showing posts with label hooks. Show all posts

Friday, December 4, 2015

D. Lawless Hardware - Free Hardware Friday - Número Cuatro

Free Hardware Friday is here again! Before we get to the hardware I will remind newcomers of the deal...

  1. Each Friday I give away a select piece or pieces of hardware totally free. You can have as many as you want to complete your stated project.
  2. In order to get the hardware the interested party must e-mail me at the address on the bottom of the post and promise to send me nice pictures of the product in use once they have installed it.  Preferably a closeup and also a shot of the full project that it is used on for perspective.
  3. Also I will need written permission to use the photos to promote our products as this is the main benefit to me that allows me to continue the promotion.
  4. I mail you the hardware and wait for the recipient to fulfill their end of the bargain. This is entirely based on trust, I won't be pestering you. You can take your time if need be.
Without further ado, this week we have a choice of these beautiful Grayson hooks from Liberty Hardware.  We have a choice of either satin nickel or brushed brass. The are 2" in diameter and have a projection of 2 7/8".

Oh yea, and this promotion is not limited to a certain number of people, so please spread the word!


If you are interested in this promotion e-mail Derrick Lawless at lawlesshardware (at) gmail (dot) com.


D. Lawless Hardware - Free Hardware Friday - Número Cuatro

Free Hardware Friday is here again! Before we get to the hardware I will remind newcomers of the deal...

  1. Each Friday I give away a select piece or pieces of hardware totally free. You can have as many as you want to complete your stated project.
  2. In order to get the hardware the interested party must e-mail me at the address on the bottom of the post and promise to send me nice pictures of the product in use once they have installed it.  Preferably a closeup and also a shot of the full project that it is used on for perspective.
  3. Also I will need written permission to use the photos to promote our products as this is the main benefit to me that allows me to continue the promotion.
  4. I mail you the hardware and wait for the recipient to fulfill their end of the bargain. This is entirely based on trust, I won't be pestering you. You can take your time if need be.
Without further ado, this week we have a choice of these beautiful Grayson hooks from Liberty Hardware.  We have a choice of either satin nickel or brushed brass. The are 2" in diameter and have a projection of 2 7/8".

Oh yea, and this promotion is not limited to a certain number of people, so please spread the word!


If you are interested in this promotion e-mail Derrick Lawless at lawlesshardware (at) gmail (dot) com.
Sunday, November 8, 2015

Small Business Partner: Treetop Wookworks

Today we are featuring another small business partner of ours Treetop Woodworks.

Treetop Woodworks - D. Lawless Hardware
Treetop Woodworks specializes in rustic home decor and operates out of Los Altos, CA. With over 1,000 sales and a full 5 star rating on Etsy you can be confident that you are getting quality work. It's almost impossible to have a full 5 star rating selling on the internet! Believe me I know!

You can click the images below to take you to the product page for that particular product or click above to go to the homepage. Oh yea, and many of these product are using hardware from D. Lawless Hardware, mostly our hooks!

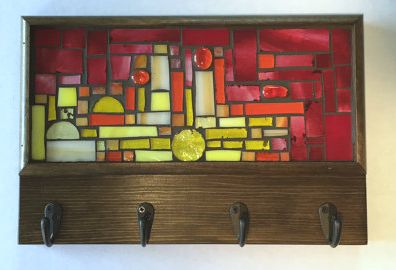
This first piece is a a beautiful mosaic glass key rack, followed by a rustic mail organizer/ key rack and a standard but very unique rustic wood coat rack.

Mosaic glass key rack - D. Lawless Hardware

mail organizer and key rack

rustic coat hook rack

Small Business Partner: Treetop Wookworks

Today we are featuring another small business partner of ours Treetop Woodworks.

Treetop Woodworks - D. Lawless Hardware
Treetop Woodworks specializes in rustic home decor and operates out of Los Altos, CA. With over 1,000 sales and a full 5 star rating on Etsy you can be confident that you are getting quality work. It's almost impossible to have a full 5 star rating selling on the internet! Believe me I know!

You can click the images below to take you to the product page for that particular product or click above to go to the homepage. Oh yea, and many of these product are using hardware from D. Lawless Hardware, mostly our hooks!

This first piece is a a beautiful mosaic glass key rack, followed by a rustic mail organizer/ key rack and a standard but very unique rustic wood coat rack.

Mosaic glass key rack - D. Lawless Hardware

mail organizer and key rack

rustic coat hook rack

Wednesday, November 4, 2015

Small Business Partner: Five1Five Signs!

Five1Five Signs uses our small single prong hooks in the production of these unique racing displays and hook racks. These would be the perfect gift for the runners or fitness enthusiasts in your family this coming holiday season!

From the owner and craftsman Andy, "We sell the best carved running medal holders out there and also take pride in our customer service! Check out our feedback from our customers to see what they think about us. I personally make each and every one in my shop here in Iowa! Current production time is between one and two weeks."


Small Business Partner: Five1Five Signs!

Five1Five Signs uses our small single prong hooks in the production of these unique racing displays and hook racks. These would be the perfect gift for the runners or fitness enthusiasts in your family this coming holiday season!

From the owner and craftsman Andy, "We sell the best carved running medal holders out there and also take pride in our customer service! Check out our feedback from our customers to see what they think about us. I personally make each and every one in my shop here in Iowa! Current production time is between one and two weeks."


Monday, October 12, 2015

Cool DIY Hook Rack at Dwelling By Happiness!

This is a really nice tutorial on how to make a really beautiful, and affordable, hook rack for your bathroom or entry way. There are so many expensive house accessories these days, a lot of times it's worth it to build it yourself. You save the pocket book and it always feels good to do something with your hands! Click over to Dwelling in Happiness to see the full tutorial. I just added a nice shot of our hooks from the finished product here.

http://www.dwellinginhappiness.com/diy-towel-rack-with-a-shelf/

Cool DIY Hook Rack at Dwelling By Happiness!

This is a really nice tutorial on how to make a really beautiful, and affordable, hook rack for your bathroom or entry way. There are so many expensive house accessories these days, a lot of times it's worth it to build it yourself. You save the pocket book and it always feels good to do something with your hands! Click over to Dwelling in Happiness to see the full tutorial. I just added a nice shot of our hooks from the finished product here.

http://www.dwellinginhappiness.com/diy-towel-rack-with-a-shelf/

Friday, September 25, 2015

Make a Cabinet Door Coat Rack

If you’re not into building a base for a coat rack, another inexpensive (and really easy) option is to use an old cabinet door. Old cabinet doors can be found in flea markets, thrift stores, or if you have a Habitat for Humanity ReStore in your area, they are an excellent source! All you do is paint it to your liking and add hooks… It doesn’t get any easier than that!

Make a Cabinet Door Coat Rack


Materials:

Cabinet Door

Coat hooks with screws

Sandpaper (100, 150, 220 grits)

Finishing supplies (primer & paint, or stain, sealer)

I found this really long cabinet door at my local Habitat for Humanity ReStore that I thought would make an excellent coat rack! I sanded the door and painted it white. I felt it needed something else so I used my vinyl and paper cutter to cut designs from vinyl to apply to the door frame. I painted over them in black (paint samples are excellent for projects like this!), then removed the vinyl when the paint was completely dry. Instead of vinyl, narrow masking tape can be used to create stripes or diamonds. Heart-shaped stickers or round stickers can be used for a fun look.

Make a Cabinet Door Coat Rack - frog tape

Make a Cabinet Door Coat Rack - use stencil

Make a Cabinet Door Coat Rack - paint it


I had a few numbered coat hooks that I was saving for just the right project… They were perfect for this!

Make a Cabinet Door Coat Rack - hook


I added a couple of large soda can tabs with washers and screws to the back of the door for hanging. Other hangers such as sawtooth or d-tabs would work equally well.

Make a Cabinet Door Coat Rack - finished


 Easy, right? Drawer handles or knobs can also be used making this a great piece for organization!

Make a Cabinet Door Coat Rack

If you’re not into building a base for a coat rack, another inexpensive (and really easy) option is to use an old cabinet door. Old cabinet doors can be found in flea markets, thrift stores, or if you have a Habitat for Humanity ReStore in your area, they are an excellent source! All you do is paint it to your liking and add hooks… It doesn’t get any easier than that!

Make a Cabinet Door Coat Rack


Materials:

Cabinet Door

Coat hooks with screws

Sandpaper (100, 150, 220 grits)

Finishing supplies (primer & paint, or stain, sealer)

I found this really long cabinet door at my local Habitat for Humanity ReStore that I thought would make an excellent coat rack! I sanded the door and painted it white. I felt it needed something else so I used my vinyl and paper cutter to cut designs from vinyl to apply to the door frame. I painted over them in black (paint samples are excellent for projects like this!), then removed the vinyl when the paint was completely dry. Instead of vinyl, narrow masking tape can be used to create stripes or diamonds. Heart-shaped stickers or round stickers can be used for a fun look.

Make a Cabinet Door Coat Rack - frog tape

Make a Cabinet Door Coat Rack - use stencil

Make a Cabinet Door Coat Rack - paint it


I had a few numbered coat hooks that I was saving for just the right project… They were perfect for this!

Make a Cabinet Door Coat Rack - hook


I added a couple of large soda can tabs with washers and screws to the back of the door for hanging. Other hangers such as sawtooth or d-tabs would work equally well.

Make a Cabinet Door Coat Rack - finished


 Easy, right? Drawer handles or knobs can also be used making this a great piece for organization!

Wednesday, September 2, 2015

Easy How to Project - Build a Planked Coat Rack

Planked Coat Rack

Coat racks are great for organization! Not only do they organize – well – “coats” but they can also organize backpacks, dog leashes and harnesses, tote bags, etc. and they are easy to make, too!

Planked Coat Rack with Coat Hooks


Materials:
1-1/4” pocket hole screws
Wood glue
Sandpaper (100, 150, 220 grits)
Finishing supplies (primer & paint, or stain, sealer)
Lumber:
1 - 1x2 at 6’
1 – tongue and groove beaded plank at 8’
I used scrap pieces of tongue and groove planks left over from another project. The pieces were about 10” long. I drilled pocket holes in the top and bottom of them so that I could secure them to a 1x2 board.

coat rack project


The length of the 1x2 will depend on the length of the planks when they are assembled. Just insert the tongue in the groove for each of the planks then measure the length and cut the 1x2. Drill pocket holes in each end of the 1x2 pieces. Secure the planks to the 1x2s using glue and 1-1/4” pocket hole screws.

coat hooks on a planked rack project


Cut two more 1x2 pieces that measure the height of the assembled piece and secure them in place with glue and 1-1/4” pocket hole screws through the pockets holes in the longer 1x2s.


Any stain or paint can be used on this piece. I chose a blue stain.

easy diy coat rack


Once the finish is dry, hooks can be added. I used double coat hooks in a nickel finish and screwed them to the front of the planking. I added hangers to the back – I normally use soda can tabs with a washer and a screw. A French cleat can be used, as well as d-ring tabs, whatever your preference!

diy coat rack close up

diy coat rack finished product


Easy How to Project - Build a Planked Coat Rack

Planked Coat Rack

Coat racks are great for organization! Not only do they organize – well – “coats” but they can also organize backpacks, dog leashes and harnesses, tote bags, etc. and they are easy to make, too!

Planked Coat Rack with Coat Hooks


Materials:
1-1/4” pocket hole screws
Wood glue
Sandpaper (100, 150, 220 grits)
Finishing supplies (primer & paint, or stain, sealer)
Lumber:
1 - 1x2 at 6’
1 – tongue and groove beaded plank at 8’
I used scrap pieces of tongue and groove planks left over from another project. The pieces were about 10” long. I drilled pocket holes in the top and bottom of them so that I could secure them to a 1x2 board.

coat rack project


The length of the 1x2 will depend on the length of the planks when they are assembled. Just insert the tongue in the groove for each of the planks then measure the length and cut the 1x2. Drill pocket holes in each end of the 1x2 pieces. Secure the planks to the 1x2s using glue and 1-1/4” pocket hole screws.

coat hooks on a planked rack project


Cut two more 1x2 pieces that measure the height of the assembled piece and secure them in place with glue and 1-1/4” pocket hole screws through the pockets holes in the longer 1x2s.


Any stain or paint can be used on this piece. I chose a blue stain.

easy diy coat rack


Once the finish is dry, hooks can be added. I used double coat hooks in a nickel finish and screwed them to the front of the planking. I added hangers to the back – I normally use soda can tabs with a washer and a screw. A French cleat can be used, as well as d-ring tabs, whatever your preference!

diy coat rack close up

diy coat rack finished product


Thursday, April 9, 2015

Making Your Own Hooks

A fun and simple do-it-yourself project is constructing your own hooks.  All you need is to pick out a base, pick your knobs and then right screws and you are all set!


1.  Pick Your Base

We have 3 styles to choose from in our hook base section: Antique Brass, Antique Pewter, and Oil Rubbed Bronze. The section is also complete with screws.


2.  Pick Your Knob

As you can see from the picture you will need to get a knob that has a hole through the middle or built in screw.  There are thousands of different looks you can give your hook with the variety of knobs available. You can even do something crazy like Adrianne at Happy Hour Projects did for her daughter as seen below where she crafted unique clay "knobs" for a really cool kids hook.


A very common choice are antique glass knobs.  These knobs give the entire piece an elegant look and there are many colors and cuts to choose from.  The hook base comes with screws so as long as your knob has a hole through the middle you can use it.  Many knobs come assembled screwed to a base, if it isn't glued all you would have to do is unscrew it and remove the actual knob to use it on your hook.  If you like to get creative you can mix and match knobs, another easy way to give your hook a unique look.  You could also use a wooden knob - even paint an unfinished wooden knob and really adding some personal touch to your project.


3.  Screws and Knob Sizes

Take into consideration the size of knob your hook is made for.  The hook bases shown here are for 1" knobs - therefore if you have a knob that is larger or smaller the screw will not fit right.  However if that is the case do not worry, we have a solution - break off screws!  These screws are great because you can actually break off the ends at specific points to make it different lengths.

4.  Mounting Your Hook

After all this the mounting is the easy part. Just screw your knob or custom top onto the base and mount as you would any other wall hook.

Making Your Own Hooks

A fun and simple do-it-yourself project is constructing your own hooks.  All you need is to pick out a base, pick your knobs and then right screws and you are all set!


1.  Pick Your Base

We have 3 styles to choose from in our hook base section: Antique Brass, Antique Pewter, and Oil Rubbed Bronze. The section is also complete with screws.


2.  Pick Your Knob

As you can see from the picture you will need to get a knob that has a hole through the middle or built in screw.  There are thousands of different looks you can give your hook with the variety of knobs available. You can even do something crazy like Adrianne at Happy Hour Projects did for her daughter as seen below where she crafted unique clay "knobs" for a really cool kids hook.


A very common choice are antique glass knobs.  These knobs give the entire piece an elegant look and there are many colors and cuts to choose from.  The hook base comes with screws so as long as your knob has a hole through the middle you can use it.  Many knobs come assembled screwed to a base, if it isn't glued all you would have to do is unscrew it and remove the actual knob to use it on your hook.  If you like to get creative you can mix and match knobs, another easy way to give your hook a unique look.  You could also use a wooden knob - even paint an unfinished wooden knob and really adding some personal touch to your project.


3.  Screws and Knob Sizes

Take into consideration the size of knob your hook is made for.  The hook bases shown here are for 1" knobs - therefore if you have a knob that is larger or smaller the screw will not fit right.  However if that is the case do not worry, we have a solution - break off screws!  These screws are great because you can actually break off the ends at specific points to make it different lengths.

4.  Mounting Your Hook

After all this the mounting is the easy part. Just screw your knob or custom top onto the base and mount as you would any other wall hook.