Call us! (618) 395-3945

Friday, January 29, 2016

Free Hardware Friday #10

THIS PROMOTION HAS ENDED. PLEASE CHECK BACK NEXT WEEK.

Good morning and thanks for checking in on another Free Hardware Friday! Today's knob is a bit unique. Now this probably isn't ideal for most projects, so just check back next week if this doesn't suit you. Today piece is this small pewter mushroom knob from Liberty Hardware.


Follow the instructions below and get as many of these as you need totally free!

If you wish to participate e-mail me at lawlesshardware @ gmail (dot) com and include...

1. Your address
2. The product number and quantity of pull you need. You can follow the links to our site for the product number. This makes it easy for me to copy and paste the orders in.
3. A promise to take photos of the project you used the knobs on and send them to me. I would like a closeup of the knob and a shot of the whole project for perspective. (Please do this as quickly as possible, low picture return rates are the ONLY thing that will stop this promotion from going forward all year)
4. Written permission to use your photography to promote our products. I might post your photo on our HomeTalk page, on this blog, on a product page, or the like. I will give credit to you or your business when using the photos.
5. Optional, but appreciated. A social media tag and/or mention us to someone!

Tuesday, January 26, 2016

Building a Simple Dining Chair

Though dining chairs may seem like an intimidating project to build, they are, in fact, very easy to construct. This particular chair is my favorite design by far, and I think I’ve finally perfected it! This chair features single piece back legs cut from 2x4s and a pretty wood appliqué attached to the upper back. I painted this chair a bright teal color but it can be painted or stained however desired!

Build a Chair


Materials:

1-1/4” pocket hole screws
5/8” brad nails
1-3/4” brad nails
Edge banding, optional
Birch wood appliqué, approx. 10” wide
Wood glue
Sandpaper (100, 150, 220 grits)
Finishing supplies (primer & paint, or stain, sealer)

Lumber:

1 - 1x3 at 8’
1 – scrap piece of 1x6 at 15”
1 – 2x2 at 4’
1 - 2x4 at 8’
1 – 2’ x 2’ sheet of  ¾” plywood

Cut List:

2 – 2x4 at 42-3/4” – Back Legs
1 – 1x6 at 15” – Upper Back
3 – 1x3 at 15” – Upper Back & Lower Stretcher
2 – 2x2 at 17-1/4” – Front Legs
1 – 1x3 at 15” – Front Stretcher
2 – 1x3 at 15” – Side Framing
1 – 1x3 at 15” – Seat Support
1 – ¾” plywood at 18” x 18” - Seat

Step One

Cut the 2x4 pieces for the back legs to length. Draw a line across the board at 18” up from the bottom. Draw a line 1-1/2” from one outside edge of the board (on the line drawn at 18”) straight down to the bottom. Make a mark at the top edge of the board 1-1/2” from the opposite side. Draw a diagonal line from the top mark (the 1-1/2” mark) down the board to the opposite end of the line drawn at 18” across the board. Draw another line from the top corner of the board to the 1-1/2” mark along the line at 18”.

Cut the legs from the 2x4 boards using a jigsaw or a bandsaw.

Stack the legs and clamp them together, then thoroughly sand. 

Build a Chair 1


Step Two

Cut the pieces for the upper back. Set the pocket hole jig for ¾” material and drill pocket holes in each end of each piece. Secure the 1x6 flush with the top edge of the legs using glue and 1-1/4” pocket hole screws. The front face of each of the upper back pieces will be flush with the front face of the back legs, following the angle.


Secure two of the remaining 1x3 pieces in the following manner, spacing the pieces 2-1/2” apart.


Step Three

Secure the last back piece to the legs using glue and 1-1/4” pocket hole screws. This time, the pocket holes will face forward and the back face of the piece will be flush with the front face of the legs.


Step Four

Cut the pieces for the front. Drill pocket holes in each end of the 1x3 piece. Secure the 1x3 piece to the legs using glue and 1-1/4” pocket hole screws. The back face of the 1x3 piece will be flush with the inside face of the legs.


Step Five

Cut the pieces for the sides and drill pocket holes in each end. Secure the sides to the front and back legs using glue and 1-1/4” pocket hole screws. The back face of the side pieces will be flush with the inside face of the legs.


Cut the piece for the seat support and drill pocket holes in each end. Secure the seat support to the front and the back 1x3 pieces using glue and 1-1/4” pocket hole screws.

Step Seven

Cut the piece for the seat. If using edge banding to cover the exposed edges of the plywood, it will be applied prior to securing the seat to the chair frame.  The seat can also be pieced together using smaller boards and pocket holes with pocket screws.

Cut the notches in the seat using a jigsaw, then secure the seat to the frame using glue and 1-3/4” brad nails.


Step Eight

Secure the wood appliqué to the upper back using glue and 5/8” brad nails. When driving the brad nails, position them so they are in a recess of the appliqué. For example, the brad nails will be less noticeable if they are placed between the leaves or petals of the flowers.

Build a Chair - Wood Applique


Finish the chair as desired!

Monday, January 25, 2016

Desk Makeover from Once Upon a Window

We recently got some beautiful photos from Once Upon a Window of the Liberty Hardware bail pulls featured on the makeover below. But, much to my dismay, we are out of that product! And it's discontinued so I wasn't going to be able to post the wonderful photos of the desk and pulls from Joni. So I decided I'd post a preview here and link over to share her wonderful work!

This desk makeover proves that nothing is beyond repair!

Before...


After...


Hop over to her Facebook Page for more beautiful makeovers!

Friday, January 22, 2016

D. Lawless' Hardware Trends Heading Into 2016 [Infographic]

We put together this infographic from our sales statistics showing the trend in the upcoming year and the popularity of finishes on our own website and google trends search data.


D. Lawless' Hardware Trends Heading Into 2016 [Infographic]

We put together this infographic from our sales statistics showing the trend in the upcoming year and the popularity of finishes on our own website and google trends search data.


Free Hardware Friday #9

THIS PROMOTION HAS ENDED. PLEASE CHECK BACK NEXT FRIDAY!

Good morning! I hope it's the start of a great weekend for everyone! Today's free knob is this "rough and smooth" tumbled antique brass knob, 1 1/2". It's a very nice knob from Liberty Hardware. We've got a great deal because they are discontinued. I've got news for Liberty though, you can't discontinue it if we're still carrying it!

Click here to see the product page for full details of the knob.

Free Hardware Friday #9 - Tumbled Antique Brass

Follow the instructions below and get as many of these as you need totally free!

If you wish to participate e-mail me at lawlesshardware @ gmail (dot) com and include...

1. Your address
2. The product number and quantity of pull you need. You can follow the links to our site for the product number. This makes it easy for me to copy and paste the orders in.
3. A promise to take photos of the project you used the pulls on and send them to me. I would like a closeup of the pull and a shot of the whole project for perspective. (Please do this as quickly as possible, low picture return rates are the ONLY thing that will stop this promotion from going forward all year)
4. Written permission to use your photography to promote our products. I might post your photo on our HomeTalk page, on this blog, on a product page, or the like. I will give credit to you or your business when using the photos.
5. Optional, but appreciated. A social media tag and/or mention us to someone!

Wednesday, January 20, 2016

How to Add Casters to a Chair

Having casters on desk chair legs is almost a necessity, especially in a carpeted room! Without casters, certain types of chair legs can scratch flooring and make it difficult to move the chair out from a desk especially when sitting in it! It is really, really easy to add casters to a desk chair leg. The casters used for this tutorial have a flat, square plate on the top and are secured using screws with pre-drilled holes in the ends of the legs. These casters are better suited to square chair legs.

Install Casters


Supplies:

Chair with square legs
Twin wheel casters, set of four
1-1/2” wood screws, #8
Drill with a 9/32 bit (for pre-drilling the holes in the legs)
#2 Phillips bit

On the chair in this post, casters (with a metal post and sleeve) had been previously installed. They worked great for awhile but the chair was used on a carpeted surface. The holes in the chair legs that housed the sleeves were worn and enlarged from scooting the chair on the carpet and the casters need to be replaced. (On carpeted surfaces, it is best to use one of the plastic mats specifically designed for chairs with casters – they are generally available at office supply stores.)

How to Install Casters


The holes in the chair legs were filled with Water Putty which when dry, is very hard and will make it easier to add new casters to the chair. A product such as Bondo or Plastic Wood can also be used.

New holes will have to be pre-drilled in the bottom of the chair legs to accommodate the screws. When the holes are pre-drilled, this keeps the wood from cracking and splitting which will cause an entirely new issue!

The plate of the caster will be aligned on the bottom of the chair leg and the holes in the plate are marked with a pencil. Place a piece of masking tape on the drill bit at the length of the screw to eliminate any guesswork as to how deep the pre-drilled holes are. 


How to Install Casters on wood

Install Casters Install Casters

Drill the holes for the screws at the marks. The pre-drilled holes should be slightly smaller in diameter than the screws used to fasten the plates. This will ensure that the screws will not eventually work themselves out of the holes!

drill holes, Install Casters

Once the holes are drilled, position the casters on the bottom of the chair legs and drive the screws though the holes in the caster plates into the pre-drilled holes in the chair legs.


Install Casters - D. Lawless Hardware

Not only can you add casters to desk chair legs but casters can also be added to the legs of benches, cabinets, bookcases, or dressers for added portability. (For cabinets, bookcases, or dressers, using at least two locking casters is recommended for safety reasons!) Casters can also be added to a footstool or ottoman, even tables, desk, or kitchen islands (with the proper locking casters where needed). This is a quick and easy project you can definitely take on yourself!

D. Lawless of course carries a large selection of casters for any project!

Tuesday, January 19, 2016

11 White Kitchen Design Ideas

Over the years we've been working with the decor and design crowd we've had the pleasure of being the hardware source for a number of beautiful white kitchens. Luckily, a lot of the folks we work with also run business websites or blogs featuring their work and they don't mind if I use their work as examples!

Below I've listed many of the beautiful white kitchens from around the design world featuring hardware available at D. Lawless Hardware. However, hardware is just a small part of these projects. And I know most of you are here for ideas beyond hardware. So I've left the marketing to a minimum and I'll just focus on the full kitchen space so that those of you with a redesign in your future can gather some ideas for what you want in your home.

This first kitchen comes from I Heart Naptime. Jamielyn updated her kitchen with a nice pairing of white and grey tones. For the cabinet hardware she decided to keep it as simple as possible with little black knobs on each cabinet. Also, stainless steel appliances go great with the tile and creates a nice sliding scale of tones from the white cabinets to the black cabinet knobs.

White and grey kitchen makeover on iheartnaptime.com -love the pops of color!

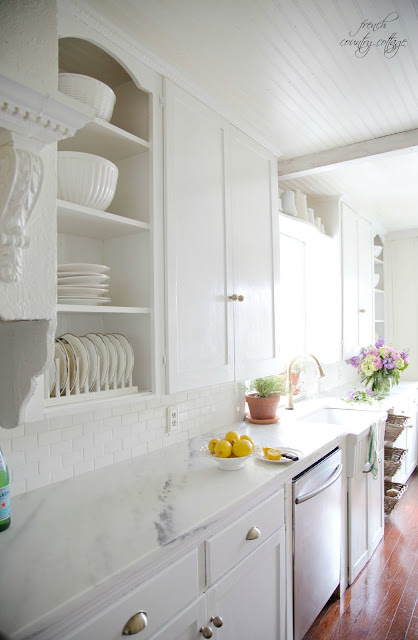
This white kitchen from French Country Cottage keeps nearly everything white and instead of creating a contrast with the hardware, Courtney uses subtle antique brasses which reflect a soft light and go nicely with the whites.

White Kitchen Ideas - French Country Cottage

Another nice example of a white and grey tone kitchen comes from Suburble. This kitchen sticks a bit more to the white and grey scheme with the grey paint around the cabinet and the satin nickel hardware. The satin nickel hardware matches the stainless steel appliances perfectly and fits right in with the grey tones from the rest of the kitchen.

Cup Pulls in Kitchen-5

This fine example of creating contrast in your white kitchen comes from The Woodgrain Cottage. Shayna used black light fixtures and black hardware on the white background of the kitchen to create a truly beautiful kitchen in this fixer upper. The before and after is quite amazing!

Fixer Upper Makeover by The Wood Grain Cottage

Wow! This next post from Maison de Pax shows off why satin nickel and white are used together so often. Stainless steel and satin nickel are pretty much interchangeable and she uses this to her advantage by matching her appliances with satin nickel hardware, light fixtures, and faucet. A great touch is the soft grey paint above and the soft grey tile on the floor.

gorgeous classic white kitchen renovation and budget tips | maisondepax.com

Ashley at Cherished Bliss brings us this lovely white kitchen makeover with a bit of a twist. She uses antique pewter hardware, grey tile, and a wood counter top to really add some nice touches and set her white kitchen apart from many of the others we've seen. The antique pewter hardware is a great touch, creating contrast with the white cabinets but staying within the white and grey pallet.

Love this beautiful Farmhouse Cottage Kitchen. Shaker style cabinets, butcher block counter tops, and cast iron sink. All done on a budget!

This kitchen comes to us from Rachel at Shades of Blue Interiors where she just built and added this DIY kitchen island to her white kitchen. This beauty shows off what can be done with wood tones and soft earth tones around a white kitchen. White cabinet and white appliances are a nice background for the wood counter tops, cutting boards, and blinds. Also the wood goes really nicely with the earth tone floor tiles. Oil rubbed bronze hardware of course has a brownish tint and fits in nicely.

White Kitchen Ideas - Shades of Blue Interiors

The next kitchen is a mix of white and grey and show off a beautiful match between matte chrome hardware, stainless steel appliances and soft grey cabinets. You can see the full makeover at Yellow Bliss Road.

edIMG_8539

The following examples will give you taste of how stainless steel bar pulls are a great choice to go with in your white kitchen, especially if you are sporting stainless steel appliances. The first example is from Decor Chick.

Sherwin Williams Alabaster

And the second example is from Wife in Progress. A lot of people think bar pulls give too much of an industrial look, but when paired with stainless steel appliances, many times bar pulls can help give a modern and stylish look. The Lawless family actually has stainless steel appliances paired with bar pulls in their kitchen.

A simple kitchen update by switching out cabinet pulls | WifeinProgressBlog.com

The final white kitchen comes from Just a Girl and her Blog and shows how having a white kitchen can help make even a small space seem larger. Abby has black appliances in this kitchen and they look great against the white background.

Beautiful white IKEA SEKTION GRIMSLOV kitchen with aqua and green accents, a gorgeous marble hexagon backsplash, and quartz countertops. | JustAGirlAndHerBlog.com

I hope some of these great projects help you on your way to your own beautiful white kitchen. Clicking through to the posts will give you a lot more ideas. We were very lucky to have our hardware featured in these projects! Happy remodeling!