
Wednesday, September 30, 2015
Frozen Inspired Vanity Redo & Decoupage Tutorial at Evey's Creations
This is one of the most creative projects we've ever had the pleasure of having our hardware featured on and it comes from Evey's Creations! The full article features a how to on the redoing the dresser and more interestingly, the decoupage artwork all over the front. And most importantly, to us anyways :), she used some of our octagon glass pulls that have been gaining in popularity a lot lately.
Monday, September 28, 2015
D. Lawless Brass Icebox Hardware at Sawdust 2 Stitches
Our icebox hardware is specially designed from years in the furniture making business. We produced or sold so many iceboxes back in the day that we actually had our own reproduction name plates made. The "White Clad" ice box sign as it was originally manufactured was "Simmons Hardware Co." We replaced Simmons with Lawless back in the early 90's and actually upset quite a few people with the move. But hey, they are reproductions anyways!
Below the set is seen being used on the popular DIY blog Sawdust 2 Stitches on a re-purposed dresser. We were very lucky to get these great photos of the product in use!
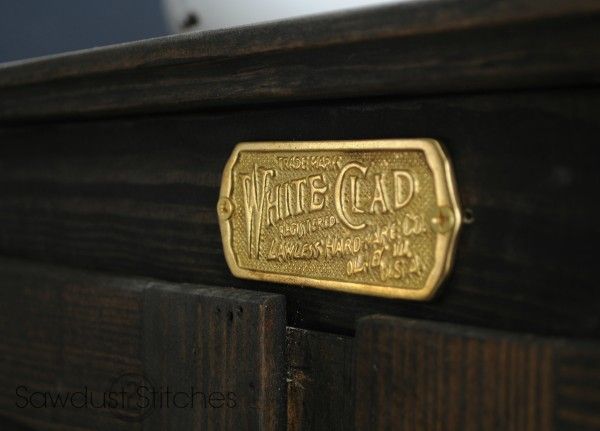
Below the set is seen being used on the popular DIY blog Sawdust 2 Stitches on a re-purposed dresser. We were very lucky to get these great photos of the product in use!
D. Lawless Brass Icebox Hardware at Sawdust 2 Stitches
Our icebox hardware is specially designed from years in the furniture making business. We produced or sold so many iceboxes back in the day that we actually had our own reproduction name plates made. The "White Clad" ice box sign as it was originally manufactured was "Simmons Hardware Co." We replaced Simmons with Lawless back in the early 90's and actually upset quite a few people with the move. But hey, they are reproductions anyways!
Below the set is seen being used on the popular DIY blog Sawdust 2 Stitches on a re-purposed dresser. We were very lucky to get these great photos of the product in use!
Below the set is seen being used on the popular DIY blog Sawdust 2 Stitches on a re-purposed dresser. We were very lucky to get these great photos of the product in use!
Friday, September 25, 2015
Make a Cabinet Door Coat Rack
If you’re not into building a base for a coat rack, another inexpensive (and really easy) option is to use an old cabinet door. Old cabinet doors can be found in flea markets, thrift stores, or if you have a Habitat for Humanity ReStore in your area, they are an excellent source! All you do is paint it to your liking and add hooks… It doesn’t get any easier than that!

Materials:
Cabinet Door
Coat hooks with screws
Sandpaper (100, 150, 220 grits)
Finishing supplies (primer & paint, or stain, sealer)
I found this really long cabinet door at my local Habitat for Humanity ReStore that I thought would make an excellent coat rack! I sanded the door and painted it white. I felt it needed something else so I used my vinyl and paper cutter to cut designs from vinyl to apply to the door frame. I painted over them in black (paint samples are excellent for projects like this!), then removed the vinyl when the paint was completely dry. Instead of vinyl, narrow masking tape can be used to create stripes or diamonds. Heart-shaped stickers or round stickers can be used for a fun look.


I had a few numbered coat hooks that I was saving for just the right project… They were perfect for this!

I added a couple of large soda can tabs with washers and screws to the back of the door for hanging. Other hangers such as sawtooth or d-tabs would work equally well.

Make a Cabinet Door Coat Rack
If you’re not into building a base for a coat rack, another
inexpensive (and really easy) option is to use an old cabinet door. Old cabinet
doors can be found in flea markets, thrift stores, or if you have a Habitat for
Humanity ReStore in your area, they are an excellent source! All you do is
paint it to your liking and add hooks… It doesn’t get any easier than that!
Materials:
Cabinet Door
Coat hooks with screws
Sandpaper (100, 150, 220 grits)
Finishing supplies (primer & paint, or stain, sealer)
I found this really long cabinet door at my local Habitat
for Humanity ReStore that I thought would make an excellent coat rack! I sanded
the door and painted it white. I felt it needed something else so I used my
vinyl and paper cutter to cut designs from vinyl to apply to the door frame. I
painted over them in black (paint samples are excellent for projects like
this!), then removed the vinyl when the paint was completely dry. Instead of
vinyl, narrow masking tape can be used to create stripes or diamonds.
Heart-shaped stickers or round stickers can be used for a fun look.
I had a few numbered coat hooks that I was saving for just
the right project… They were perfect for this!
I added a couple of large soda can tabs with washers and
screws to the back of the door for hanging. Other hangers such as sawtooth or
d-tabs would work equally well.
Thursday, September 24, 2015
D. Lawless Antique Style Glass Pulls at Vintage Refined!
We are lucky to get to work with a number of creative people during our marketing and efforts to grow and Ashley at Vintage Refined is no exception. She recently completed this beautiful yellow dresser makeover and topped it off using some of our clear glass pulls! You can click the image to get through to see her whole article or click here to see the pulls.
Wednesday, September 23, 2015
D. Lawless Label Holders at 58 Water Street!
We were lucky enough to be included in a furniture flipping contest recently and one of the contestants, Colleen at 58 Water Street, used a set of our antique brass label holders on this beautiful green dresser. Click through to see the project at 58 Water Street.
Thursday, September 17, 2015
Beautiful Handcrafted Glass Knobs from Design Studio 180 On Sale Now!
A long time coming! This collection of fused glass knobs is the first from Design Studio 180 and we are proud to have them up on our site. Phillip Mambro of Design Studio 180 partnered with us and used our bases to create a variety of styles of modern style glass knobs.
You can see the whole collection here, but for here are a few of my favorites.
Mirrored Amber w/ Antique Brass

Mirrored Blue w/ Black


You can see the whole collection here, but for here are a few of my favorites.
Mirrored Amber w/ Antique Brass

Mirrored Blue w/ Black

Black Glass w/ Black Base

Beautiful Handcrafted Glass Knobs from Design Studio 180 On Sale Now!
A long time coming! This collection of fused glass knobs is the first from Design Studio 180 and we are proud to have them up on our site. Phillip Mambro of Design Studio 180 partnered with us and used our bases to create a variety of styles of modern style glass knobs.
You can see the whole collection here, but for here are a few of my favorites.
Mirrored Amber w/ Antique Brass
Mirrored Blue w/ Black
You can see the whole collection here, but for here are a few of my favorites.
Mirrored Amber w/ Antique Brass
Mirrored Blue w/ Black
Black Glass w/ Black Base
Tuesday, September 15, 2015
DIY Plans to Build a Mirror Frame
The frame only looks complicated… The frame allows for a rectangular mirror instead of an arched mirror!

Materials:
- 1” pocket hole screws
- 1-1/4” pocket hole screws
- Wood glue
- Sandpaper (100, 150, 220 grits)
- Finishing supplies (primer & paint, or stain, sealer)
Lumber:
- 1 - 1x3 at 8’
- 1 – ½” x 6” craft board (generally sold in 3’ or 4’ lengths)
- 1 – ¼” x 2” craft board
Cut List:
- 2 1x3 at 33” – Frame Sides
- 1 – 1x3 at 27” – Frame Bottom
- 1 – ½” x 6 craft board at 22” – Arch
- 1 – ¼” x 2 craft board at 22-1/2” – Back Strip
Step One
Cut the pieces for the frame. Using a router and a ¼” rabbeting bit, cut a ¼” deep rabbet along one long edge of each piece. Cut a 45° miter in each end of the 27” piece, and one end only of each 33” piece – treating each piece as a left and a right. With the pocket hole jig set for ¾” material, drill pocket holes in each end of the 27” piece miters. Assemble the frame using glue and 1-1/4” pocket hole screws.


Step Two
Cut the piece for the arch. Cut the arch using a jigsaw or a bandsaw. Set the pocket hole jig for ½” material and drill pocket holes in each end. Secure the arched piece to the inside of the frame sides using glue and 1” pocket hole screws. The front face of the arched piece will be flush with the front of the frame.


Step Three
Cut the piece for the back strip. Apply glue to one surface and clamp in place over the back side of the arch resting on the rabbets on the side piece. Let dry.

Finish as desired. Cut a mirror to fit the opening on the back, securing in place with mirror adhesive, a picture framing tab gun, or mirror clips. Glass or Plexiglas can also be used.
DIY Plans to Build a Mirror Frame
The frame only looks complicated… The frame allows for a
rectangular mirror instead of an arched mirror!
Materials:
- 1” pocket hole screws
- 1-1/4” pocket hole screws
- Wood glue
- Sandpaper (100, 150, 220 grits)
- Finishing supplies (primer & paint, or stain, sealer)
Lumber:
- 1 - 1x3 at 8’
- 1 – ½” x 6” craft board (generally sold in 3’ or 4’ lengths)
- 1 – ¼” x 2” craft board
Cut List:
- 2 1x3 at 33” – Frame Sides
- 1 – 1x3 at 27” – Frame Bottom
- 1 – ½” x 6 craft board at 22” – Arch
- 1 – ¼” x 2 craft board at 22-1/2” – Back Strip
Step One
Cut the pieces for the frame. Using a router and a ¼”
rabbeting bit, cut a ¼” deep rabbet along one long edge of each piece. Cut a
45° miter in each end of the 27” piece, and one end only of each 33” piece –
treating each piece as a left and a right. With the pocket hole jig set for ¾”
material, drill pocket holes in each end of the 27” piece miters. Assemble the
frame using glue and 1-1/4” pocket hole screws.
Step Two
Cut the piece for the arch. Cut the arch using a jigsaw or a
bandsaw. Set the pocket hole jig for ½” material and drill pocket holes in each
end. Secure the arched piece to the inside of the frame sides using glue and 1”
pocket hole screws. The front face of the arched piece will be flush with the
front of the frame.
Step Three
Cut the piece for the back strip. Apply glue to one surface
and clamp in place over the back side of the arch resting on the rabbets on the
side piece. Let dry.
Finish as desired. Cut a mirror to fit the opening on the
back, securing in place with mirror adhesive, a picture framing tab gun, or
mirror clips. Glass or Plexiglas can also be used.
Wednesday, September 9, 2015
Green Buffet Makeover - Before & After
Another nice project from local refurbisher Gary with hardware provided by us of course!
He starts with a very worn and dated looking buffet...

Tons of scratches and dings and the hardware was totally shot...


He starts with a very worn and dated looking buffet...

Tons of scratches and dings and the hardware was totally shot...

We have a nice selection of bail pulls but Gary decided to take this project in a whole different direction by using these serrated pulls and serrated knobs from Liberty Hardware. The final result is really nice and I'm sure he'll have no problem turning a profit on this one.


Green Buffet Makeover - Before & After
Another nice project from local refurbisher Gary with hardware provided by us of course!
He starts with a very worn and dated looking buffet...
Tons of scratches and dings and the hardware was totally shot...
He starts with a very worn and dated looking buffet...
Tons of scratches and dings and the hardware was totally shot...
We have a nice selection of bail pulls but Gary decided to take this project in a whole different direction by using these serrated pulls and serrated knobs from Liberty Hardware. The final result is really nice and I'm sure he'll have no problem turning a profit on this one.
Subscribe to:
Posts (Atom)